
Breakfast & Brunch
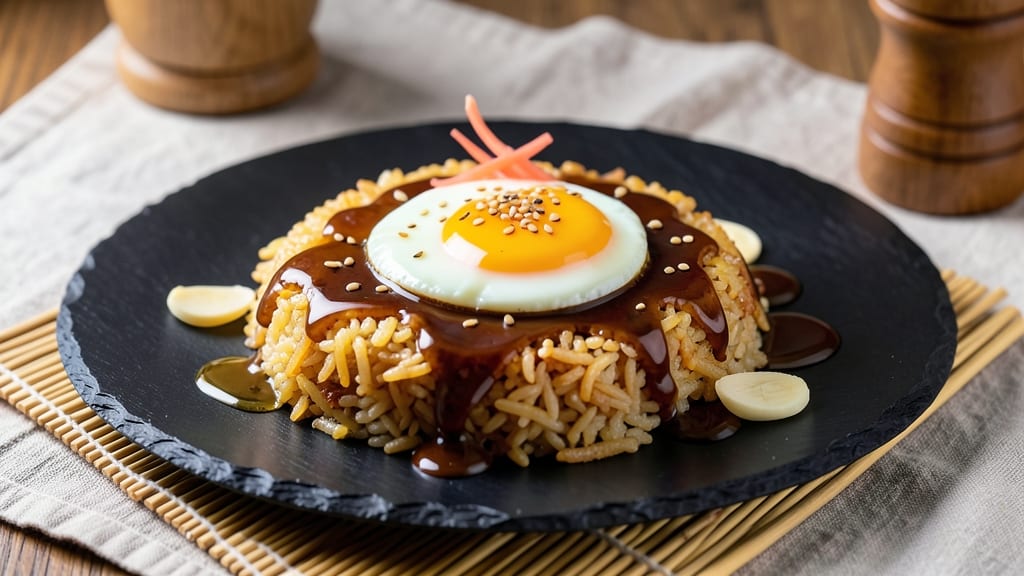
This Asian fried egg recipe transforms a simple breakfast into a wok-heated masterpiece with crispy edges and a silky, runny yolk that pools like liquid gold. 💛 The secret lies in high-heat wok cooking, where the egg develops a delicate balance of texture—crunchy around the edges, tender in the center—while absorbing the savory depth of soy, garlic, and sesame.
I perfected this technique after years of experimenting with Asian street food staples, and it’s now my go-to for quick, restaurant-quality meals.
The magic happens in just 3 minutes of active cooking, where precise timing ensures the egg doesn’t overcook while the wok achieves that signature smoky aroma.
A splash of soy sauce and a drizzle of sesame oil infuse the egg with umami richness, while a pinch of chili flakes adds a subtle kick.
This method works equally well for breakfast or dinner, making it a versatile addition to any meal—whether paired with steamed rice, crispy noodles, or fresh greens.
What sets this recipe apart is the foolproof technique that guarantees a perfect egg every time, even for beginners. The high heat of the wok creates a crispy crust that contrasts beautifully with the custardy yolk, while the aromatics elevate the dish beyond a simple fried egg.
The result is a bite that’s both satisfying and elegant, with layers of flavor that linger.
Serve these eggs alongside pickled vegetables, a side of rice, or a simple broth for a complete meal. The crispy texture and rich flavors make this dish a standout, proving that a single egg can be the star of the plate. Let’s get cooking!
Ingredients for asian fried egg
Four eggs, bold flavors, and wok mastery create restaurant-worthy bites every time.
| Ingredient | Amount | Notes |
|---|---|---|
| Large Eggs 🥚 | 4 whole | Room temperature for even cooking |
| Vegetable Oil 🫒 | ½ cup | High smoke point preferred |
| Light Soy Sauce 🍶 | 1 tbsp | Kikkoman preferred for balance |
| Sesame Oil 🫒 | 1 tsp | Toasted for authentic aroma |
| Garlic Cloves 🧄 | 3 cloves | Minced finely for depth |
| Fresh Ginger 🌿 | 1 tsp | Grated finely for zing |
| Red Chili Flakes 🌶️ | ¼ tsp | Adjust for heat preference |
| White Rice 🍚 | 1 ½ cups | Uncooked, long-grain preferred |
| Green Onions 🧅 | 2 whole | Thinly sliced for garnish |
| Salt 🧂 | ½ tsp | Kosher or sea salt |
| Black Pepper 🌶️ | ¼ tsp | Freshly ground for finish |
The wok is non-negotiable here—cast iron or carbon steel delivers that signature smoky aroma. Costco or restaurant supply stores carry great options, but any deep, heavy skillet works in a pinch. Vegetable oil handles the high heat without burning, but avocado oil is my go-to for extra stability. Fresh garlic and ginger are essential for that authentic umami punch—Asian markets often have pre-minced versions if you're short on time. Look for vibrant, firm ginger with no soft spots, and garlic cloves that feel plump and firm. The soy sauce should be light, not dark—Kikkoman is the gold standard for this technique.
No sesame oil? Toasted peanut oil at half the amount mimics the nutty depth, though it won't be identical. Substituting dried chili flakes for fresh? Use double the amount since they lack moisture. The eggs can be separated if you prefer just whites or yolks, but the magic happens with whole eggs—room temperature is critical for even cooking. For the rice, jasmine varieties add a fragrant complement, but any long-grain white works. Prefer your eggs less crispy? Reduce oil to 2 tablespoons and cook 10 seconds less per side.
Wok-heated eggs keep best at room temperature for 30 minutes post-cooking, but refrigerate any leftovers within that time. Store in an airtight container for 2 days, though they're best enjoyed fresh. The rice reheats beautifully—just add a splash of water and steam for 2 minutes. For meal prep, cook the rice ahead and store separately. The aromatics (garlic, ginger, chili) lose potency after 3 days in the fridge, so make a fresh batch if you're prepping multiple days in advance.
Why You'll Love This Recipe
- Five-Ingredient Magic: I swear by this recipe when I’m too tired to think. Crack eggs, heat oil, minced garlic sizzling—done. No chopping, no fussing, just that golden, runny center waiting for you.
- Umami Bomb: That first crack of sesame oil into the pan? Pure flavor payoff. Light soy sauce adds depth, garlic cloves turn it savory, and suddenly, a simple fried egg feels like a restaurant dish.
- Breakfast or Snack: Honestly, I eat these cold in rice bowls at lunch or straight from the pan at midnight. The crispy edges hold up, the yolk stays rich—no reheating needed, just reheat the craving.
- Pocketbook Hero: Eggs are cheap, oil lasts forever, and a few cloves of garlic stretch across meals. I’ve fed a family of four for under $5 with this—plus, leftovers reheat in seconds without drying out.
Step-by-step instructions for crispy Asian fried eggs
Master the perfect wok-hei technique for eggs with silky yolks and crisp edges.
🔥 Step 1: Prep the Wok and Heat the Oil
Place a 12-inch wok or skillet over high heat until it's screaming hot—you should see a thin layer of smoke when you hold your hand above it. Add the ½ cup vegetable oil and let it heat for 2-3 minutes until it shimmers and small bubbles form around the edges. The oil should be hot enough to sizzle when you drop in a pinch of rice.
Here's the thing—if the oil isn't hot enough, your eggs will steam instead of crisp. You'll know it's ready when the oil looks like it's ready to jump out of the pan. Keep the heat at high throughout cooking—this is what creates that signature wok-hei flavor and crispy texture.
🍳 Step 2: Cook the Aromatics for Flavor Base
Add the 3 minced garlic cloves and 1 teaspoon grated fresh ginger to the hot oil. Stir for 30 seconds until the garlic turns golden and the ginger becomes fragrant—don't let it brown or it'll turn bitter. Add the ¼ teaspoon red chili flakes and stir for another 10 seconds to distribute the heat evenly.
This aromatic step builds the flavor foundation. The garlic should smell sweet and nutty, not burnt. If you notice any dark spots forming, immediately reduce the heat to medium-high and stir constantly until they disappear. These aromatics will infuse the eggs with depth that transforms them from ordinary to extraordinary.
👨🍳 Step 3: Fry the Eggs to Crispy Perfection
Crack each of the 4 large eggs into a small bowl (this prevents them from breaking when you add them to the hot wok). Using a small ladle or spoon, carefully pour each egg into the wok, spacing them about 2 inches apart. Let them cook undisturbed for 1-2 minutes until the whites are set but the edges are still slightly translucent.
Here's where it gets tricky: when the whites are about 80% set and the edges start to crisp, gently flip each egg using two spatulas. Cook for another 30-45 seconds until the other side is golden and the yolks remain runny. The key is high heat and minimal movement—this creates the crispy exterior while keeping the yolks silky.
🥘 Step 4: Finish with Seasoning and Garnish
Remove the eggs from the wok and transfer them to a plate lined with paper towels to drain any excess oil. Return the wok to medium heat and add the 1 tablespoon light soy sauce and 1 teaspoon sesame oil. Stir for 20 seconds until the soy sauce reduces slightly and coats the bottom of the pan.
Pour this fragrant sauce over the eggs, then sprinkle with the ½ teaspoon salt, ¼ teaspoon black pepper, and 2 thinly sliced green onions. The sesame oil adds nutty aroma while the soy sauce balances the richness. Serve immediately with the 1.5 cups cooked white rice to soak up every delicious drop of sauce.
⏰ Step 5: Master the Timing for Perfect Results
This recipe works best when served immediately, but if you need to hold them briefly, keep the eggs warm by placing them on a wire rack set over a baking sheet in a 200°F oven for up to 10 minutes. The crispy edges will soften slightly, so serve as soon as possible for that restaurant-quality crunch.
Real talk: the secret to these eggs isn't just the technique—it's the confidence in your timing. Watch the whites set but keep the yolks runny, and you'll nail it every time. These crispy, flavorful eggs pair perfectly with the rice to create a complete meal that's simple yet impressive.
Pro Tips For Making Asian Fried Egg
- CRISP THE GARLIC FIRST: Toss minced garlic in the pan with oil on medium heat until it’s just golden—about 30 seconds—before adding the egg. I learned this the hard way: raw garlic burns into bitterness when the egg hits, and you’ll taste it in every bite. Let that aroma develop first, then crack the egg in.
- USE COLD EGGS: Pull eggs straight from the fridge for this one. Cold eggs slide into the pan cleaner and hold their shape better, especially when you’re aiming for that neat, runny center. Room-temperature eggs? They’ll spread like a lazy Sunday morning.
- SALT THE PAN BEFORE OIL: Sprinkle a pinch of salt into the dry pan before adding oil—it’ll dissolve into the hot fat and season the egg as it cooks. I skip this sometimes, and the egg tastes bland no matter how much soy sauce I drizzle after. Lazy move, but it makes a real difference.
- DRIZZLE SOY LAST: Add light soy sauce only in the final 10 seconds of cooking, right after the egg whites set but before the yolk fully firms. Too early, and it burns; too late, and it pools instead of caramelizing. A quick tilt of the pan helps it spread evenly—no need to stir.
Best sauces and condiments for this dish
Soy Sauce Variations
Light soy sauce is essential for balance, but dark soy adds depth and color. Swap 1 tablespoon light soy with ½ tablespoon dark soy for a richer, caramelized finish—great for visual appeal.
For a tangy twist, use 1 tablespoon rice vinegar instead of half the soy sauce. I love this combo for a brighter, slightly sour profile that cuts through the richness. 🍶
Sesame Oil Alternatives
Toasted sesame oil is non-negotiable for authentic aroma, but peanut oil works in a pinch. Use ½ teaspoon toasted peanut oil and add ¼ teaspoon ground sesame seeds for texture. For a smoky note, replace sesame oil with ½ teaspoon chili oil—it adds heat and complexity.
I’ve also used toasted walnut oil for a nutty depth, though it lacks the toasty sesame punch. 🌰
Spicy Sauce Boosters
Red chili flakes are mild, but Sriracha or gochujang take it up a notch. Stir ½ teaspoon Sriracha into the soy sauce for heat and sweetness, or mix ½ teaspoon gochujang with ½ teaspoon honey> for a sticky, fermented kick.
For a fresh heat, add 1 teaspoon finely chopped Thai bird’s eye chilies> to the aromatics. I keep a small jar of chili crisp> on hand for a quick drizzle over finished eggs. 🌶️
Umami Enhancers
Miso paste adds a fermented depth that elevates these eggs. Stir ½ teaspoon white miso> into the soy sauce for a savory, slightly sweet note. For a meaty flavor, add ½ teaspoon fish sauce> to the aromatics—it’s a secret weapon in Southeast Asian cooking.
I also love a dash of doubanjiang> (Chinese chili bean paste) for a spicy, funky twist. Just ¼ teaspoon> is enough to transform the dish. 🍜
Sweet-Tangy Balance
Add a touch of sweetness to contrast the savory and spicy. Drizzle ½ teaspoon honey> or maple syrup> over the eggs before serving, or stir it into the soy sauce. For a tangy finish, squeeze ½ teaspoon lime juice> over the top.
I often mix 1 teaspoon hoisin sauce> into the soy sauce for a sticky, slightly sweet balance that’s irresistible. 🍯
Herb and Garnish Ideas
Green onions are classic, but cilantro and Thai basil add freshness. Chop 2 tablespoons cilantro> and sprinkle over the eggs for a bright, citrusy note. For a fragrant finish, use 4 leaves Thai basil>, torn by hand.
Toasted sesame seeds> add crunch, while crispy fried shallots> bring a sweet, crunchy contrast. I also love a sprinkle of toasted nori flakes> for an oceanic umami kick. 🌿
Nutrition facts
Frequently asked questions
Can I make this recipe without a wok?
A wok isn't strictly necessary! Use a 12-inch cast iron skillet or heavy stainless steel pan for similar results. The key is maintaining high heat and keeping the pan hot throughout cooking. A nonstick pan works too, but avoid overcrowding the eggs to prevent steaming instead of crisping.
What's the secret to getting that perfect runny yolk?
The magic happens with high heat and minimal movement. Cook the eggs undisturbed until the whites are about 80% set (edges crisp but center still slightly translucent), then flip carefully. The yolks should remain completely liquid—if they start to thicken, you've overcooked them. Room-temperature eggs also help maintain that silky texture.
How do I adjust this recipe for spicier or milder flavors?
For milder heat, reduce the chili flakes to ⅛ teaspoon or omit entirely. For extra spice, add ½ teaspoon gochujang (Korean chili paste) to the soy sauce or sprinkle ½ teaspoon chili crisp over finished eggs. Thai bird's eye chilies (finely chopped) can also be added to the aromatics for fresh heat.
Can I make these eggs ahead of time?
Fresh is best, but you can prep components ahead: cook the rice in advance and store separately. For the eggs, fry them just before serving—the crispy texture softens quickly. If you must reheat, warm in a 200°F oven for 5 minutes on a wire rack to maintain some crunch. The aromatics lose potency after 3 days refrigerated, so make fresh if prepping ahead.
What are some great side dishes to serve with these eggs?
These crispy eggs pair perfectly with steamed jasmine rice, pickled vegetables (like quick-pickled cucumbers or radishes), or a simple miso soup. For extra texture, serve with crispy fried shallots or toasted sesame seeds. A side of stir-fried greens with garlic adds freshness, while kimchi brings tangy contrast.