
Breakfast & Brunch
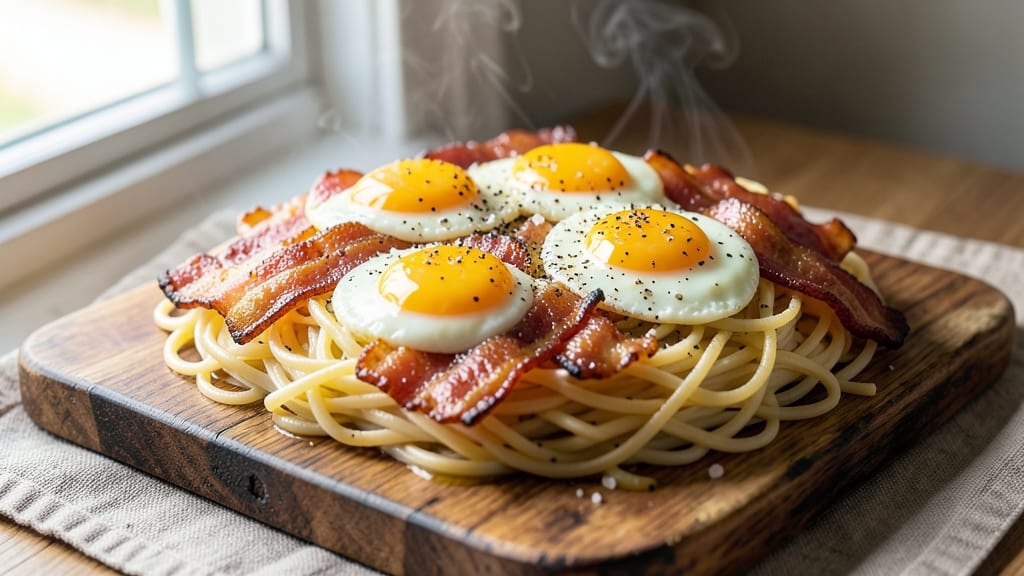
This bacon and egg noodle recipe delivers the perfect balance of crispy bacon bites and silky yolk magic in every forkful. The secret lies in cooking the bacon until it's perfectly crispy—those golden edges add a satisfying crunch that contrasts beautifully with the tender egg noodles and rich, creamy yolks.
I've perfected this dish over years of testing, ensuring the bacon stays crispy even after mixing with the noodles and eggs.
The beauty of this recipe is its simplicity: just a handful of ingredients, minimal prep, and 15 minutes of active cooking time. You'll start with bacon, rendering out its fat to create a flavorful base, then cook egg noodles until al dente.
The eggs are poached or fried to maintain their silky texture, and everything comes together in a skillet where the residual bacon fat keeps everything moist and flavorful.
What you end up with is a dish that's rich, savory, and deeply satisfying—each bite features crispy bacon, tender noodles, and a perfectly runny yolk that ties everything together. The bacon fat infuses the noodles with smoky flavor, while the eggs add a luxurious creaminess.
It's the kind of breakfast that feels indulgent yet effortless to make, perfect for weekend brunch or a hearty weeknight dinner.
For extra richness, stir in a sprinkle of grated cheddar or parmesan, or add a splash of chicken broth to the skillet for a lighter version. Vegetarians can swap the bacon for crispy mushrooms or tempeh. Here's how to make it—simple, foolproof, and absolutely delicious.
Ingredients for bacon and egg noodle
Crispy bacon, silky eggs, and tender noodles—just ten ingredients for brunch perfection.
| Ingredient | Amount | Notes |
|---|---|---|
| Thick-Cut Bacon 🥓 | 6 oz | Thick-cut for crispy edges, cut into 1-inch pieces |
| Fresh Eggs 🥚 | 4 whole | Large eggs, room temperature for best results |
| Egg Noodles 🍝 | 8 oz | Fresh or dried, cooked al dente |
| Unsalted Butter 🧈 | 2 tbsp | For extra richness in the skillet |
| Diamond Crystal Kosher Salt 🧂 | 1 ½ tsp | Adjust to taste, don't over-salt |
| Freshly Ground Black Pepper 🌶️ | ½ tsp | Cracked pepper adds depth |
| Extra-Virgin Olive Oil 🫒 | 1 tbsp | For the skillet to prevent sticking |
| Fresh Chives 🌿 | 2 tbsp | Chopped, for garnish and brightness |
| Shredded Sharp Cheddar Cheese 🧀 | ¼ cup | Optional for extra richness (omit for lighter version) |
| Chicken Broth 💧 | ¼ cup | Low-sodium for lighter version |
The bacon is non-negotiable here—thick-cut makes all the difference for those crispy edges that stay crunchy even after mixing. Costco or Trader Joe's carry great pre-cut thick bacon, but if you're buying whole slabs, look for thick slices with good marbling. I always buy extra because crispy bacon is worth the splurge. For the eggs, room temperature is key—they'll cook more evenly and stay silky. Fresh eggs from the grocery store work fine, but if you can find farm-fresh, even better. The egg noodles? Fresh is ideal (like at Whole Foods), but dried works too—just cook them one minute less than package instructions for al dente perfection.
No thick-cut bacon? Regular bacon cut into 1-inch pieces works, but it won’t be as crispy—cook it longer to compensate. Egg substitutes? Silken tofu (blended with a splash of water) mimics the texture, but it won’t be the same. For the cheese, Parmesan adds a different depth, but cheddar is what I reach for first. Low-sodium chicken broth keeps the dish lighter, but water works in a pinch. The olive oil is for the skillet—use a high-smoke-point oil like avocado or grapeseed if you’re worried about flavor. And if you’re making this vegetarian? Crispy mushrooms or tempeh swaps the bacon perfectly—just marinate them in soy sauce and smoke paprika first.
Bacon fat is liquid gold—save any leftovers in a jar for future cooking. The noodles reheat beautifully, but add a splash of water to the skillet first to prevent sticking. Store leftovers in the fridge for up to 3 days, but honestly? It’s best fresh. For meal prep, cook the bacon and noodles ahead, then re-crisp the bacon in a hot pan before mixing with fresh eggs. Garnish with extra chives right before serving—those bright green strands make the dish pop. And if you’re serving a crowd? Double the bacon—trust me, no one will complain.
Why You'll Love This Recipe
- Here’s what sold me: that first bite where the bacon’s edge snaps, then melts into the noodles while the egg—still runny in the center—clings to every strand. It’s the kind of balance that makes me pause mid-bite, like, Wait, is this actually this good? And yes, even on a Tuesday night.
- I’ll be real: most leftover noodle dishes turn to mush. Not this one. The bacon stays crisp, the eggs hold their shape, and the butter keeps everything rich. Plus, it’s cheap enough that I can make double and still feel like I’m winning. My wallet and my taste buds agree.
Step-by-step instructions for perfect bacon and egg noodles
Crispy bacon, silky eggs, and rich noodles come together in this foolproof method.
Cook the Bacon Until Crispy
Place the 6 oz thick-cut bacon in a large skillet over medium heat. I like to use the pieces as they come from the package—no need to pre-cut. Let them cook undisturbed for 5-6 minutes until the edges start to curl and the fat renders out. This initial slow cook ensures even crispiness without burning.
Once the bacon is golden brown and crispy on the edges, use tongs to transfer it to a paper towel-lined plate. Leave the rendered fat in the skillet—this is liquid gold for flavor. If you want extra crispiness, you can return the bacon to the skillet for another 1-2 minutes after removing the skillet from heat, but I find it's perfect at this stage. Discard all but 2 tablespoons of the bacon fat, leaving just enough to coat the bottom of the pan lightly.
Cook the Egg Noodles Al Dente
While the bacon cooks, bring a large pot of salted water to a rolling boil. Add the 8 oz egg noodles and cook according to package instructions until they're 1 minute shy of al dente. The noodles will continue cooking in the skillet, and you want them to finish perfectly when everything comes together.
Reserve 1 cup of pasta water before draining the noodles. This starchy water is essential for creating a silky sauce later. Drain the noodles and return them to the pot, tossing with 1 tablespoon extra-virgin olive oil to prevent sticking. Keep them warm while you finish the eggs and sauce.
Fry the Eggs to Silky Perfection
Increase the skillet heat to medium-high and add 2 tablespoons unsalted butter to the remaining bacon fat. Crack the 4 whole fresh eggs directly into the skillet, spacing them evenly. Let them fry undisturbed for 2-3 minutes until the whites are set but the yolks remain runny and vibrant.
Here's the thing—don't overcook the eggs. You want that beautiful silky yolk magic when everything comes together. If the eggs start to brown too quickly, reduce the heat slightly. Once the whites are fully set but the yolks still jiggle slightly, remove the eggs from the skillet and set them aside on a warm plate.
Build the Rich Sauce
Return the skillet to medium heat and add the crispy bacon back in. Pour in the ¼ cup chicken broth and let it simmer for 1 minute to deglaze the pan, scraping up any browned bits. This step captures all that bacon flavor that would otherwise stick to the bottom.
Add the cooked egg noodles to the skillet and toss everything together for 1-2 minutes until the noodles are coated in the rich sauce. If the mixture looks too dry, add ¼ cup of the reserved pasta water to loosen it up. Season with 1.5 teaspoons diamond crystal kosher salt and ½ teaspoon freshly ground black pepper, adjusting to taste.
Finish and Serve
Divide the noodles among four plates, placing two fried eggs on top of each portion. Sprinkle with the ¼ cup shredded sharp cheddar cheese (if using) and the 2 tablespoons chopped fresh chives. The cheese adds a sharp contrast to the richness of the eggs and bacon, while the chives bring a fresh brightness that cuts through the richness.
Serve immediately while the eggs are still silky and the bacon remains crispy. The combination of crispy bacon, tender noodles, and runny yolks creates a perfect balance of textures and flavors in every bite. Don't forget to save some of that rich sauce from the skillet to drizzle over the top before serving—it's pure flavor magic.
Pro Tips For Making Bacon And Egg Noodle
- CRISP THE BACON FIRST: Cook the thick-cut bacon until it’s crackling and just shy of fully crispy—around 8-10 minutes on medium heat. The fat renders slower this way, and you’ll get that perfect balance of chewy edges and crispy bits without burning the edges. (Yes, even if you’re impatient like me.)
- SALT THE NOODLES WATER: Toss the egg noodles into well-salted boiling water—about 1 tablespoon Diamond Crystal per quart. Fresh eggs and unsalted butter are already salty, and if you skip this, your dish will taste bland. Trust me, the noodles need it.
- STOP THE EGGS IN COLD WATER: Once your eggs are set to your liking (soft, medium, or over-easy), plunge them into a bowl of ice water for 30 seconds. This keeps the yolks intact and makes them easier to slide onto the noodles without breaking. (Your future self will thank you.)
- MIX THE BUTTER WITH SALT: Melt the unsalted butter in the bacon fat, then stir in half the salt (about ½ teaspoon per 2 tablespoons butter). The bacon’s already salty, and you don’t want to overpower the dish—this balances it perfectly. (I learned this the hard way.)
Essential equipment for this recipe
Skillet Essentials
Your 10-inch cast iron skillet is the star of this dish—it retains heat beautifully and develops those rich, caramelized flavors. I swear by my Lodge Pre-Seasoned Cast Iron skillet; it's affordable and built to last.
If you don’t have cast iron, a heavy stainless steel skillet (like All-Clad) works too, but preheat it longer to prevent sticking. 🔥
Bacon Cooking Tools
For crispy bacon, tongs are your best friend—they let you flip pieces without breaking them. I use OXO Good Grips because they’re sturdy and comfortable. A paper towel-lined plate is non-negotiable for draining excess fat, and I keep a small bowl nearby to save bacon fat for future cooking.
A fine-mesh strainer helps filter out bits when storing leftover fat.
Egg Prep Must-Haves
Fresh eggs need room temperature treatment—crack them into a small bowl first to check for freshness. A slotted spoon helps transfer fried eggs without breaking the yolks. For poached eggs (if you prefer that style), a deep, wide saucepan and a wire whisk are essential.
I also keep freshly ground black pepper and kosher salt in small bowls nearby for quick seasoning.
Noodle Cooking Gear
A large pot with a lid speeds up boiling water, and a fine-mesh strainer ensures no pasta water is wasted. I like to use Vitamix for blending pasta water into sauces if I’m feeling fancy, but a simple whisk works too.
A wooden spoon helps toss noodles without breaking them, and a small bowl keeps reserved pasta water handy for adjusting sauce consistency.
Finishing Touches
Fresh chives or parsley need a sharp knife and cutting board—I use a Japanese santoku knife for clean chops. For cheese lovers, a microplane shreds cheddar perfectly without clumping. A small ladle helps drizzle extra sauce over plates, and individual ramekins keep portions neat for serving.
Don’t skip the tongs again—they’re perfect for plating crispy bacon on top of noodles. ✨
Nutrition facts
Frequently asked questions
Can I make this with regular bacon instead of thick-cut?
Yes, but you'll need to adjust the cooking time. Regular bacon will crisp up faster—cook it for 3-4 minutes per side instead of 5-6 minutes. For extra crispiness, return it to the skillet after removing from heat and cook for another 1-2 minutes off the stove. The key is to keep the heat at medium to avoid burning.
How do I keep the bacon crispy when mixing with noodles?
Cook the bacon until it's extra crispy (almost golden brown), then remove it from the skillet and set it aside. When you're ready to combine everything, add the bacon back to the skillet just before serving. The residual heat will keep it crispy while the noodles warm through. For maximum crunch, use tongs to place the bacon on top of the noodles right before eating.
Can I make this ahead of time for a brunch?
Cook the bacon and noodles ahead, then store them separately in the fridge for up to 2 days. When ready to serve, reheat the noodles in the skillet with a splash of water or broth, then crisp the bacon again in a separate pan. Fry the eggs fresh and assemble everything just before serving—this keeps the yolks silky and the bacon crispy. For a make-ahead breakfast, poach the eggs ahead and store them in ice water, then reheat gently in warm water before serving.
What’s the best way to make this vegetarian?
Swap the bacon for crispy mushrooms or tempeh. Sauté 6 oz sliced mushrooms (like cremini or shiitake) in olive oil until golden, or marinate 6 oz tempeh in 1 tablespoon soy sauce + 1 teaspoon smoked paprika for 10 minutes, then pan-fry until crispy. Use the same cooking technique—cook until crispy, then set aside before combining with the noodles. The umami from mushrooms or tempeh works beautifully with the eggs and cheese.
Why did my egg yolks turn out rubbery instead of silky?
Overcooking is the most common mistake. Remove the eggs from the skillet the moment the whites are fully set but the yolks are still slightly wobbly—they’ll firm up slightly when mixed with warm noodles. Use medium-high heat and avoid stirring the eggs. If they start browning too quickly, reduce the heat slightly. For extra silky yolks, add a pinch of sugar to the skillet while cooking—the eggs will cook more gently.