
Breakfast & Brunch
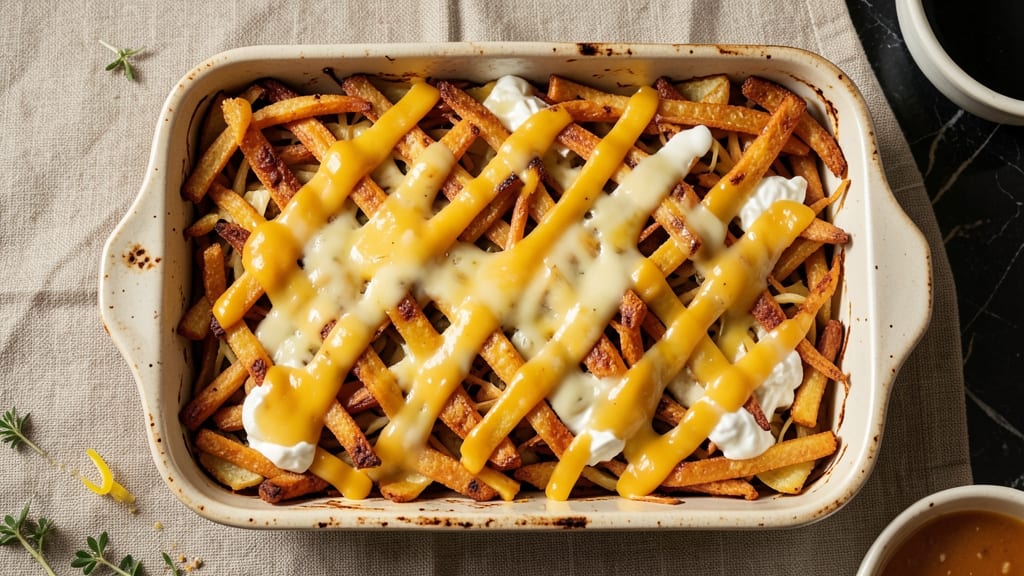
This shredded potato egg casserole recipe delivers the perfect balance of crispy golden edges and creamy, cheesy layers—all in one easy-to-bake pan. 🔥 The secret lies in layering shredded potatoes with a rich egg mixture and baking until the top turns irresistibly crisp while the center stays tender.
I developed this recipe after years of testing, and it’s now a brunch staple that never fails to impress, whether served for a family breakfast or a crowd-pleasing meal prep dish.
The magic happens with a few simple techniques: pre-cooking the potatoes slightly for better texture, using a mix of cheddar and cream cheese for depth, and letting the casserole rest before slicing.
This ensures every bite has that satisfying contrast—crispy on top, creamy in the middle—without requiring any fancy skills. The dish is naturally vegetarian but packed with protein from the eggs, making it a hearty yet comforting option for any morning.
What makes this recipe stand out is its versatility—add sautéed onions, bell peppers, or even spinach for extra flavor, or keep it classic with just cheese and herbs. The crispy top forms a delicious crust that holds up perfectly when sliced, while the creamy layers melt in your mouth.
It’s the kind of dish that transforms a simple breakfast into a showstopper, and the best part? It bakes while you sleep, so you wake up to a ready-to-serve meal.
Perfect for meal prep, weekend brunches, or even a comforting dinner, this casserole is a game-changer for anyone who loves one-pan convenience without sacrificing flavor. Let’s get started—your kitchen (and taste buds) will thank you.
Ingredients for shredded potato egg casserole
Six hearty servings of crispy-cheesy perfection—just potatoes, eggs, and a few clever tricks.
| Ingredient | Amount | Notes |
|---|---|---|
| Russet Potatoes 🥔 | 3 lb | Pre-shredded or freshly shredded |
| Large Eggs 🥚 | 8 whole | Room temperature preferred |
| Sharp Cheddar Cheese 🧀 | 2 cups | Shredded, full-fat preferred |
| Cream Cheese 🧀 | 8 oz | Room temperature for blending |
| Heavy Whipping Cream 🥛 | ½ cup | Full-fat for creaminess |
| Milk 🥛 | ½ cup | Whole milk preferred |
| Salt 🧂 | 1 ½ tsp | Diamond Crystal kosher salt |
| Black Pepper 🌶️ | ½ tsp | Freshly ground preferred |
| Garlic Powder 🧄 | ½ tsp | For subtle depth |
| Fresh Chives 🌿 | ¼ cup | Chopped, for garnish |
| All-Purpose Flour 🌾 | 2 tbsp | For crispy topping |
| Unsalted Butter 🧈 | 2 tbsp | Melted for topping |
| Onion Powder 🧅 | ¼ tsp | Enhances flavor |
| Dried Parsley 🌿 | ¼ tsp | For extra herby notes |
The potatoes are the foundation, so grab Russet—they shred beautifully and hold up to baking without turning mushy. Pre-shredding saves time, but if you're ambitious, a mandoline or box grater gives you more control. For the cheese, sharp cheddar is non-negotiable—it's what gives that tangy depth, while cream cheese adds the velvety texture. Pro tip: Walmart's Great Value or Kroger's private label cheddar shreds perfectly without clumping. The cream cheese? Philadelphia is my go-to—it blends smoothly and delivers that signature creaminess. If you're feeling fancy, Cabot or Tillamook cheddar takes it to the next level.
No sharp cheddar? Pepper Jack adds a kick, or Monterey Jack for a milder option. Running low on cream cheese? Sour cream in a pinch (reduce by 2 tbsp) works surprisingly well. The flour-butter topping is where the crispy magic happens—King Arthur flour gives the best texture, but any all-purpose will do. For the eggs, room temperature is key—they blend smoother and create a lighter custard. Fresh chives add brightness, but if you're out, green onion or parsley does the trick. Want extra flavor? Sauté bell peppers or onions first and mix them into the potato layers—just don't overcook them or they'll turn mushy.
This casserole tastes even better the next day, so double the batch if you're feeding a crowd. Store leftovers in the fridge for 4-5 days—the crispy top stays intact if you reheat covered at 350°F for 15-20 minutes. For meal prep, assemble it the night before and bake in the morning. The topping gets extra crispy if you broil it for 2-3 minutes at the end—just watch it like a hawk. Freezes beautifully for up to 3 months if you wrap it tightly in foil. Pro move: portion into individual servings before freezing for grab-and-go brunches.
Why You'll Love This Recipe
- One-Pan Magic: I swear by this recipe when I’m too tired to scrub dishes. Shred those Russets, mix in the eggs and cheeses, bake—done. The potatoes soften perfectly while the top stays golden, and honestly? I’ve never had a single pan left in the sink afterward.
- Cheesy, Creamy Bliss: That sharp cheddar and cream cheese combo is where it’s at. The first bite hits with a rich, tangy pull, then melts into something dangerously addictive. The heavy cream ties it all together—creamy but not heavy, and the eggs? They turn fluffy, like a cloud you don’t want to leave.
- Meal Prep MVP: Between us, this is my go-to for busy mornings. Make it Sunday night, store it in the fridge, and reheat portions all week—no sad leftovers here. It’s solid for breakfast-for-dinner nights, potlucks (no one will guess it’s prepped ahead), or even a quick lunch when you’re running late.
- Budget Breakfast Hack: Russets and eggs are cheap, and a block of cheddar stretches far. I’ve fed my whole family for under $10, and they’re still asking for seconds. Plus, it’s one of those recipes where the ingredients you do use get put to their best advantage—no wasted cream cheese or wilting potatoes here.
Step-by-step instructions for shredded potato egg casserole
Here's how to create that perfect golden crust with creamy, melt-in-your-mouth layers—every time.
👨🍳 Step 1: Prepare the Potato Mixture
Start by shredding the 3 lb Russet Potatoes using a box grater or food processor. I like to use freshly shredded potatoes—they hold up better during baking and create a creamier texture. Transfer the shredded potatoes to a large bowl and sprinkle evenly with 1 tsp Salt, 0.25 tsp Onion Powder, and 0.25 tsp Dried Parsley. Toss gently to distribute the seasonings.
Next, add the 8 oz Cream Cheese (cut into small cubes) and the 2 cups Sharp Cheddar Cheese to the bowl. Use your hands to work the cream cheese into the potatoes until it melts completely and creates a thick, creamy base. This step is crucial—it ensures the potatoes absorb all that rich dairy flavor. If the mixture looks too dry, add 2 tablespoons of the 0.5 cup Milk to help bind everything together.
🥘 Step 2: Create the Egg Cream Mixture
In a separate bowl, whisk together the 8 whole Large Eggs, 0.5 cup Heavy Whipping Cream, and the remaining 0.25 cup Milk until just combined—no need to overbeat. The mixture should be smooth but still slightly thick. Here's the thing—room temperature eggs blend better and create a lighter texture, so if yours are cold, let them sit out for 10-15 minutes before using.
Gradually pour the egg mixture into the potato bowl and stir gently with a rubber spatula, being careful not to overmix. You want to combine everything just enough to distribute the eggs evenly without creating lumps. Sprinkle in 0.5 tsp Garlic Powder, 0.5 tsp Black Pepper, and the remaining 0.5 tsp Salt, then fold these in thoroughly. The mixture should look thick and creamy—like a rich, cheesy potato pudding.
🔥 Step 3: Assemble and Bake the Casserole
Preheat your oven to 350°F and grease a 9x13-inch baking dish with 2 tbsp Unsalted Butter (or use nonstick spray). Spread the potato mixture evenly into the prepared dish, using the back of a spoon to smooth the top. Here's where the magic happens: sprinkle the 2 tbsp All-Purpose Flour evenly over the entire surface, followed by the 0.25 cup Fresh Chives and any remaining 0.25 tsp Dried Parsley. This flour topping creates that coveted crispy crust we're after.
Bake uncovered for 50-55 minutes until the top is deep golden brown and the center is just set (no jiggle when gently shaken). The reason we bake uncovered is to allow that top to crisp properly—don't be tempted to cover it early or you'll end up with a soggy top. If the edges brown too quickly, loosely tent them with aluminum foil after 30 minutes to prevent over-browning while the center finishes cooking.
⏰ Step 4: Rest and Serve with Confidence
Remove the casserole from the oven and let it rest for 10-15 minutes before serving. This resting period allows the layers to set properly and makes it easier to slice cleanly. The internal temperature should reach 160°F at the center—use an instant-read thermometer to check if you're unsure. The contrast between that crispy golden top and the creamy, cheesy potato layers is what makes this dish so special.
Slice into 6 generous portions (about 1½ cups each) and serve immediately. The crispy top should shatter slightly when cut, revealing that velvety cheese-potato mixture beneath. For extra flair, garnish each serving with an additional sprinkle of fresh chives and a crack of black pepper. This casserole tastes even better the next day, so it's perfect for meal prep—just reheat covered in the microwave for 2-3 minutes or in the oven at 325°F until warmed through.
Pro Tips For Making Shredded Potato Egg Casserole
- Boil Potatoes Until Tender: I learned this the hard way—boiling Russets for exactly 8-10 minutes (skin-on) gives you fluffy shreds that hold up to mixing, not mushy glue. Overcook, and your casserole turns into a sad, wet pile. Undercook, and you’ll be chewing shreds of raw potato. Rinse them right after boiling in ice water to stop the cooking—this keeps them firm when shredded.
- Mix Eggs at Room Temp: Cold eggs from the fridge won’t blend smoothly with your heavy cream and cream cheese, leading to clumps or a grainy texture. Pop the eggs out of the fridge 15 minutes before mixing—same goes for the dairy. Trust me, your future self will notice the difference when the casserole comes out silky instead of lumpy.
- Layer Cheese Strategically: Don’t just dump all the cheddar on top—half of it belongs inside the potato-egg mix. The outer layer will melt into a perfect crust, but the inner cheese keeps the whole dish gooey and cohesive. Sprinkle shredded cheddar halfway through the casserole, then top with a thin layer of cream cheese mixed with a splash of heavy cream for that ultra-rich finish.
- Bake Low and Slow: Crank the oven to 350°F (not 375° or higher) and bake this for at least 40 minutes—no peeking! High heat makes the top brown too fast while the center stays wet. If the edges are golden but the middle’s wobbly, tent it with foil and let it finish steaming. Patience here means no rubbery eggs or undercooked potatoes.
Make-ahead tips for this recipe
Night-Before Prep
Assemble the entire casserole the night before and refrigerate it uncovered. This overnight chill prevents sogginess and ensures that crispy top forms beautifully. The next morning, bake it straight from the fridge at 350°F for 55-60 minutes—no need to thaw!
This method works perfectly for busy mornings or lazy weekends when you want to wake up to a ready meal. 🌙
Freezer-Friendly Assembly
For ultimate convenience, assemble the casserole in a freezer-safe 9x13-inch dish, cover tightly with plastic wrap and aluminum foil, and freeze for up to 3 months.
When ready to bake, thaw overnight in the fridge, then bake at 375°F for 60-65 minutes—the higher temp compensates for the cold start. I like to add an extra 1 tbsp butter to the flour topping before freezing for extra crispiness. ❄️
Meal Prep Portions
Divide baked casserole into individual portions before storing for grab-and-go brunches. Wrap each serving tightly in parchment paper and store in an airtight container for up to 5 days.
Reheat covered in the microwave for 2-3 minutes or in a 350°F oven for 15 minutes—the crispy top stays intact if you cover it loosely with foil for the last 2 minutes. 📅
Double Batch for Crowds
Make this casserole in a 9x13-inch and 8x8-inch pan simultaneously for a crowd—just halve the recipe for each pan. Bake both at 350°F for 50-55 minutes, then combine or serve separately.
For extra flavor, add sautéed mushrooms or caramelized onions to one batch and keep the other classic. This is my go-to for holiday brunches or family gatherings! 👨👩👧👦
Broiler Finish
For an extra-crispy top, transfer the baked casserole to a broiler-safe dish and broil for 2-3 minutes at the end of baking. Watch closely—this step transforms the top into a golden, shatterable crust.
I recommend doing this only after the casserole has reached 160°F internally to avoid overcooking the center. 🔥
Storage Hacks
Store leftovers in the fridge for 4-5 days in an airtight container with a paper towel pressed on top to absorb excess moisture. For reheating, cover with foil and warm at 325°F for 15-20 minutes—this keeps the texture creamy without drying it out.
If reheating from frozen, add 5-10 minutes to the baking time. 💡
Nutrition facts
Frequently asked questions
Why does my shredded potato casserole turn out soggy?
Sogginess usually happens when the potatoes release too much moisture before baking. To fix this, pre-cook the shredded potatoes for 5 minutes in boiling water, then drain and squeeze out excess moisture with a clean towel. Also, avoid overmixing the egg mixture—just combine gently to keep the texture light. Baking uncovered helps too!
Can I make this casserole without cream cheese?
Yes! Replace the cream cheese with 4 oz sour cream or ½ cup Greek yogurt for a lighter texture. For extra richness, use ½ cup milk instead of the cream cheese. The dish will still be creamy, just with a slightly different mouthfeel. If you love tang, try ½ cup buttermilk instead!
How do I get an extra-crispy top?
The secret is the flour-butter topping! For maximum crispiness, sprinkle 3 tbsp flour mixed with 3 tbsp melted butter on top before baking. Bake uncovered for the full time, then broil for 2-3 minutes at the very end. Watch closely—it burns fast! Another trick: chill the assembled casserole overnight before baking.
What veggies can I add to this recipe?
This casserole is perfect for sneaking in veggies! Try sautéing 1 cup bell peppers or 1 cup onions until soft, then mix into the potato layers. For greens, stir in 2 cups spinach or 1 cup frozen peas—they'll wilt down nicely. Just don't overcook them or they'll turn mushy. Mushrooms work too!
Can I make this gluten-free?
Replace the all-purpose flour topping with 2 tbsp gluten-free flour (like rice flour) mixed with 1 tbsp cornstarch and 1 tbsp melted butter. For extra crispiness, sprinkle 1 tbsp gluten-free breadcrumbs** on top. Just make sure all your other ingredients (like cheese) are certified gluten-free too!