
Main Courses
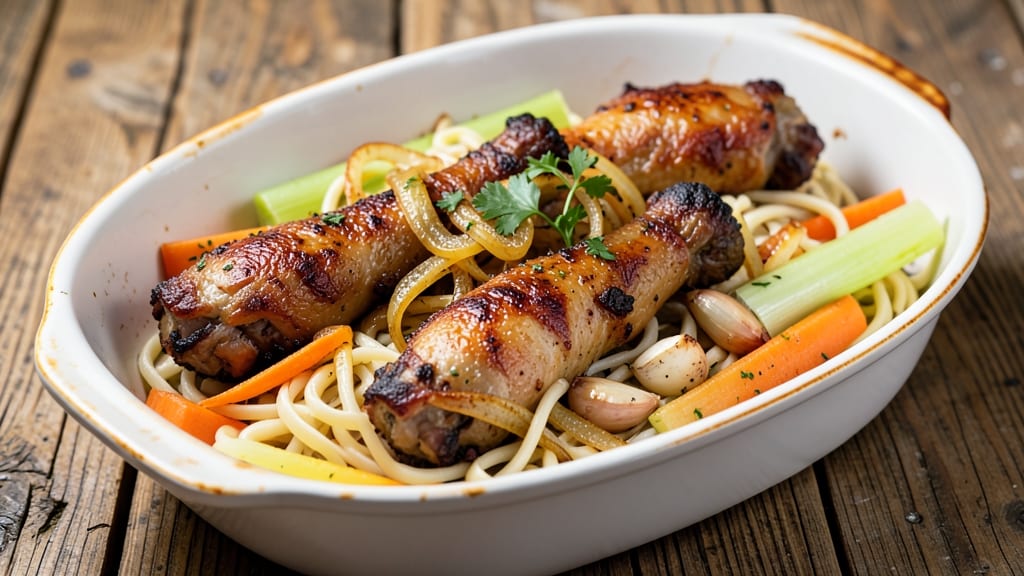
Transforming humble turkey necks and egg noodles into a restaurant-worthy dish is where slow cooking truly shines—this recipe delivers melt-in-your-mouth tenderness with deep umami flavor that clings to every forkful.
The secret lies in low-and-slow braising, where collagen-rich turkey necks break down into rich, velvety strands that coat egg noodles in a luxurious sauce. I've perfected this technique over years of testing, ensuring the final result is so rich and satisfying it becomes the centerpiece of any meal.
What sets this dish apart is the balance of simplicity and depth. You'll start with aromatics—garlic, onions, and herbs—that build flavor as they caramelize, then let the turkey necks simmer until they're fork-tender, creating a broth that reduces into a concentrated, flavorful sauce.
The egg noodles absorb this rich sauce beautifully, transforming them from simple carbs into the perfect vehicle for every savory note.
By the time you're done, you'll have a dish that's impossibly tender yet packed with flavor—turkey necks that fall apart at the touch of a fork, coated in a glossy, umami-rich sauce that clings to perfectly cooked egg noodles.
The aroma alone will have everyone gathering at the table, and each bite delivers that perfect harmony of textures and flavors that makes this dish worth the wait.
This recipe is perfect for feeding a crowd, meal prepping for the week, or treating yourself to a comforting dinner that feels like a hug in bowl form.
The technique is straightforward, but the results are anything but ordinary—this is the kind of dish that elevates simple ingredients into something extraordinary.
Ingredients for turkey necks and egg noodles
These rich, umami-packed ingredients transform simple turkey necks into a luxurious dish that feels like a restaurant masterpiece.
| Ingredient | Amount | Notes |
|---|---|---|
| Turkey Necks 🦃 | 3 lb | Bone-in for maximum collagen |
| Egg Noodles 🍜 | 12 oz | Fresh or dried, medium width |
| Yellow Onion 🧅 | 1 whole | Diced, yellow or red |
| Garlic Cloves 🧄 | 6 cloves | Peeled, smashed for aroma |
| Carrots 🥕 | 4 medium | Peeled, cut into chunks |
| Celery Stalks 🧆 | 4 whole | Diced, with leaves |
| Fresh Thyme 🌿 | ½ ounce | Or 1 tbsp dried |
| Fresh Bay Leaves 🍃 | 2 whole | For deep herbal notes |
| Low-Sodium Chicken Broth 💧 | 4 cups | Homemade or quality store-bought |
| Dry White Wine 🍷 | ½ cup | Substitute with extra broth |
| Tomato Paste 🍅 | 2 tbsp | Smooth, not chunky |
| Olive Oil 🫒 | 2 tbsp | Extra-virgin preferred |
| Salt 🧂 | 1 ½ tsp | Kosher or sea salt |
| Black Pepper 🌶️ | ½ tsp | Freshly ground |
| Worcestershire Sauce 🍶 | 1 tbsp | Vegan if needed |
Turkey necks are the star—look for bone-in, skin-on pieces at your butcher or Costco for the best collagen. 3 pounds gives you that perfect ratio of meat to sauce for six servings. The necks should be plump and smell clean, not gamey. If you can't find them fresh, frozen works too—just thaw overnight in the fridge. For the aromatics, yellow onions and celery are non-negotiable—they build that sweet, savory base that makes this dish sing. I always grab the freshest thyme from the grocery store's produce section—it's worth the extra 50 cents for that bright herbal note.
No white wine? Extra chicken broth with a splash of apple cider vinegar works perfectly—just add 1 tbsp of vinegar to the 0.5 cup broth. Fresh bay leaves are ideal, but dried works at half the amount. For tomato paste, Trader Joe's has the best squeeze tubes—no waste, and it keeps forever. The Worcestershire sauce adds that deep umami punch, but if you're avoiding it, soy sauce or coconut aminos are great swaps. The egg noodles? Fresh is ideal—they cook faster and hold up better to the long braising time, but dried works in a pinch (just check the package for cook time).
This dish tastes even better the next day—honestly, the flavors meld into something magical. Store leftovers in the fridge for up to 5 days, or freeze for 3 months. I always make a double batch because it reheats beautifully for quick lunches. To freeze, portion into meal-sized containers with a splash of broth on top to keep everything moist. When reheating, add a little extra broth or water to loosen the sauce—it thickens as it cools. The noodles absorb all that rich flavor, so don't skip the sauce when serving!
Why You'll Love This Recipe
- One-Pot Magic: I swear by this recipe—just dump everything in one pot and let it simmer. No chopping boards left in a mess, no extra dishes. The turkey necks practically fall apart on their own, and the noodles soak up all that rich broth like sponges.
- Rich, Deep Umami: Between us, the turkey necks are the star—crispy on the edges, tender inside, and packed with that savory, meaty flavor. Add the caramelized onions and garlic, and you’ve got a dish that tastes like it simmered all day, even if it didn’t.
- Meal Prep MVP: This is my go-to for busy weeks. Cook a big batch, and it reheats like a dream—no soggy noodles or dry turkey. Honestly, I’ll make it on Sundays just to have leftovers for lunch the next day. My kids even ask for it.
- Budget-Friendly Luxury: Turkey necks are the secret weapon here—cheaper than chicken thighs but just as satisfying. A single bag stretches for two meals, and the egg noodles add that homey, comforting texture without breaking the bank. (Yes, even on a Tuesday night.)
Step-by-step instructions for turkey neck and egg noodles
Transform tough turkey necks into melt-in-your-mouth richness with this slow-braised masterpiece.
Sear the Turkey Necks for Deep Flavor
Heat the 2 tablespoons olive oil in a large Dutch oven over medium-high heat until shimmering. Pat the 3 lb turkey necks completely dry with paper towels—this ensures maximum browning. Working in batches if needed, add the turkey necks and sear for 4-5 minutes per side until deeply golden brown. You're building flavor here, so don't rush this step.
The skin should develop a rich, caramelized crust that will dissolve into the braising liquid, creating layers of umami depth. Once all turkey necks are browned, remove them from the pot and set aside. Here's the thing—those browned bits are pure flavor gold, so we're not scraping them out.
Build the Aromatic Base
In the same Dutch oven, add the diced yellow onion, diced carrots, diced celery stalks, smashed garlic cloves, and 2 tablespoons tomato paste. Stir to combine and cook over medium heat for 5-6 minutes until the vegetables soften and the tomato paste darkens slightly. You'll smell that sweet, caramelized aroma—this is where the magic begins.
Add the 0.5 ounce fresh thyme, 2 whole fresh bay leaves, 1.5 teaspoons salt, and 0.5 teaspoon black pepper. Stir everything together and cook for another 1 minute to toast the spices. This step develops the herbal notes that will infuse the turkey necks throughout the braising process.
Deglaze and Braise the Turkey Necks
Pour in the 0.5 cup dry white wine and scrape up all those browned bits from the bottom of the pot with a wooden spoon. Let it simmer for 2-3 minutes until the wine reduces by half and the alcohol cooks off. This deglazing step captures all that concentrated flavor you worked so hard to create.
Add the 4 cups low-sodium chicken broth and 1 tablespoon Worcestershire sauce to the pot. Return the turkey necks to the liquid, making sure they're mostly submerged. Bring everything to a gentle simmer, then reduce heat to low—you're looking for just a few bubbles breaking the surface. Cover the pot and let it cook for 2 hours.
Cook Until Fork-Tender and Rich
After 2 hours, check the turkey necks for doneness. They should be fork-tender with no resistance when pierced—the meat should practically fall apart. If needed, continue cooking for another 30-60 minutes until perfectly tender. The liquid should have reduced to a rich, velvety consistency with a deep golden color.
If the liquid seems too thin at this point, uncover the pot and simmer for another 10-15 minutes to reduce it further. This creates a luxurious sauce that will coat every strand of noodle. Taste and adjust seasoning if needed—you might want to add a pinch more salt or a crack of black pepper to balance the flavors.
Finish with Noodles and Serve
While the turkey necks are cooking, prepare the 12 oz egg noodles according to package instructions until al dente. Drain them and set aside. In the last 10 minutes of braising, skim any excess fat from the surface of the turkey neck liquid if desired—though I like to leave some for richness.
Add the cooked noodles to the Dutch oven with the turkey necks and their braising liquid. Stir gently to combine and let everything heat through for 2-3 minutes. The noodles will absorb the rich, flavorful liquid, creating the perfect balance of tender meat and hearty noodles. Serve immediately, making sure each portion gets its share of those beautifully tender turkey necks and deeply infused sauce.
Pro Tips For Making Turkey Necks And Egg Noodles
- Brown the Necks First: Skip the slow start—sear the turkey necks in batches over medium-high heat until deeply browned on all sides. This locks in flavor and shortens the braising time later; I used to rush this and ended up with bland, rubbery meat.
- Dice Carrots Small: Cut carrots into ¼-inch pieces or smaller—they’ll stay tender without turning to mush. Larger chunks make the dish look pretty but taste like overcooked sticks. (Yes, even if you’re impatient like me.)
- Deglaze with Broth: After browning the necks, splash in ½ cup of chicken or turkey broth instead of water to lift the fond off the pan. It adds depth without thinning the sauce—something I only figured out after tasting the difference.
- Toss Noodles in Broth: Finish the noodles by boiling them in the turkey broth from the braise, not plain water. The rich flavor seeps in instantly, and you’ll save a step. (Your future self will thank you.)
Pro cooking tips for this dish
Sear Like a Pro
Never skip the sear—this is where all the magic starts. Pat your turkey necks dry with paper towels before searing to ensure maximum browning. I use a heavy Dutch oven on medium-high heat and sear each side for 4-5 minutes until deep golden brown.
Those caramelized bits are flavor gold—don’t scrape them out! They’ll dissolve into the braising liquid, creating layers of umami depth that transform tough necks into melt-in-your-mouth perfection. 🔥
Low-and-Slow Mastery
Patience is key here—braising turkey necks at low heat (just a gentle simmer) breaks down collagen into rich, velvety strands. After the initial 2-hour cook, check for tenderness by piercing with a fork.
If there’s resistance, add 1-2 more cups of broth and continue cooking for another 30-60 minutes. The sauce should reduce to a glossy, concentrated consistency that clings to every noodle. Trust the process—this isn’t the time to rush!
Deglaze for Depth
The deglazing step is non-negotiable for maximum flavor. After searing, pour in the 0.5 cup dry white wine and scrape up those browned bits with a wooden spoon.
Let it simmer for 2-3 minutes until the wine reduces by half—this captures all the concentrated flavor you worked so hard to create. No wine? Substitute with extra broth plus 1 tbsp apple cider vinegar for brightness. This step is what separates a good dish from a great one.
Noodle Timing
Cook your egg noodles al dente and drain them before adding to the pot—this prevents them from turning mushy in the rich braising liquid. In the last 10 minutes of cooking, stir the noodles into the turkey necks and sauce.
They’ll absorb all that umami goodness, transforming into the perfect vehicle for every savory bite. Pro tip: Taste the sauce before adding noodles—adjust seasoning with salt or pepper if needed. The noodles will soak up any extra seasoning, so balance is key.
Fat Skimming (Optional)
If you prefer a lighter sauce, skim excess fat from the surface in the last 10 minutes of cooking. I like to leave a little for richness, but if you’re watching calories, use a fat separator or spoon out the fat.
This step is optional but makes a noticeable difference in texture. The sauce should still coat the back of a spoon—if it’s too thin, uncover the pot and simmer for another 5-10 minutes to thicken it up. Every bite should be luxurious, not watery.
Leftovers Game-Changer
This dish tastes even better the next day—honestly, the flavors meld into something magical. Store leftovers in an airtight container in the fridge for up to 5 days. To reheat, add a splash of broth or water to loosen the sauce and warm over medium-low heat until heated through.
The noodles absorb all that rich flavor, so don’t skip the sauce when serving. Double the batch—it reheats beautifully for quick lunches and freezes well for up to 3 months. 💫
Nutrition facts
Frequently asked questions
Can I substitute turkey necks with another cut of turkey?
While turkey necks are ideal for their collagen-rich texture, you can use bone-in turkey wings or turkey thighs in a pinch. However, thighs may require 15-20 minutes less braising time since they cook faster. For best results, stick with necks—they create that signature melt-in-your-mouth quality that's hard to replicate with other cuts.
How do I know when the turkey necks are fully cooked?
The turkey necks are done when they're fork-tender with no resistance when pierced—the meat should practically fall apart. After 2 hours of braising, check by inserting a fork into the thickest part. If it slides in easily and the meat shreds, it's ready. The sauce should also reduce to a glossy, concentrated consistency that coats the back of a spoon.
Can I make this dish ahead of time?
This dish actually tastes better the next day as the flavors meld together. Store leftovers in an airtight container in the fridge for up to 5 days or freeze for 3 months. When reheating, add a splash of broth or water to loosen the sauce and warm over medium-low heat until heated through. The noodles will absorb all that rich flavor, so don't skip the sauce when serving.
What can I do if the sauce is too thin?
If your sauce seems too thin, uncover the pot and simmer for another 10-15 minutes to reduce it further. For an instant fix, mix 1 tablespoon cornstarch with 2 tablespoons cold water, stir it into the sauce, and cook for another 2-3 minutes until thickened. Alternatively, you can remove the turkey necks, skim excess fat, then reduce the remaining liquid alone before adding everything back together.
Are egg noodles the only option, or can I use other noodles?
While egg noodles are traditional, you can use fresh fettuccine, wide rice noodles, or even shirataki noodles for a lighter version. For best texture, choose noodles that hold up well to long cooking times. If using dried noodles, cook them al dente and drain before adding to the pot—they'll finish cooking in the rich braising liquid. Avoid delicate noodles like angel hair, as they may turn mushy.